Modifying Sections
Using Adhesives
Fitting Instructions for Fenders
Window Seals
Locker & Hatch Seals
Conversion Tables
If we are unable to supply a product that is exactly the size you require try adapting one of our existing products by using the following methods.
U CHANNELS
|
|
Laminate solid neoprene strip onto (A) the sides and/or bottom of the channel to increase its overall dimensions or insert into the gap (B) in the 'U' to decrease its internal dimensions. |
P OR TADPOLE SECTIONS
|
|
Laminate solid neoprene strip onto the base (A) to increase its height or onto its flange (B) to increase the length of the flange. |
HATCHSEALS
|
|
To make a hatch seal that is soft enough to compress but has a hardwearing skin, try laminating solid neoprene strip onto expanded neoprene strip using a contact adhesive (order code A139 or A262). |
EXPANDED OR SOLID NEOPRENE
If the size that you require is not listed and we are unable to obtain it for you, try laminating two sections together.
![]()
When gluing rubber it is advised that you abraid it's surface first and then degrease it with a solvent. E.g.. Acetone, MEK, Toluene or Meths. (Not an oil based one like white spirit). Ensure that the other surface you are sticking to is dry, free of dust and grease free.
If using a contact adhesive, it is best to apply one coat of adhesive to each surface and allow it to dry fully. Then apply a second coat to each surface and when tacky press the two parts together.
If using a Silicone or Polyurethane sealant, apply plenty to the joint/surface and then smooth off with a wet finger or scraper. Allow at least 24 hours to cure.
Thixofix (order code no.A139)
One 40cc tube covers approximately 0.12 square metres. Therefore you will need the following
6 metres of rubber strip up to 20 mm wide requires 1 tube.
6 metres of rubber strip up to 40 mm wide requires 2 tubes.
And so on.
Waterproof Contact Adhesive (Order code A262)
One 1/4 litre tin has a coverage area of approx. half a square metre.
Polyurethane (order code no S136) and Silicone (order code nos. S137 & S138)
Joint size Metres per 310ml cartridge
3 x 5 mm (15 sq. mm) 20.7
5 x 5 mm (25 sq. mm) 12.4
10 x 5 mm (50 sq. mm) 6.2
10 x 10 mm (100 sq. mm) 3.1
15 x 10 mm (150 sq. mm) 2.1
20 x 10 mm (200 sq. mm) 1.6
25 x 10 mm (250 sq. mm) 1.2
Please note that the above figures are theoretical only.
![]() Download fitting instructions for fenders
Download fitting instructions for fenders
D FENDERS

U FENDERS

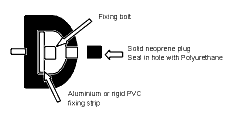
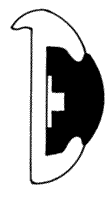
This type of fender normally locates onto a flange protruding from the side of the boat.
ALUMINIUM/RIGID PVC FENDERS

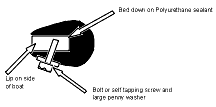
This fender is normally supplied in lengths approx. 3.65 metres long.
Listed below are the most common types of seals used on boat windows. Obviously some boat manufacturers like to have a design peculiar to them (these are not necessarily shown below). We would be pleased to try and source rubber sections for you or come up with an alternative product that will be suitable for your application. Please either send us a sample or a sketch of the section giving dimensions and material type that you require.
CLAYTONRITE WINDOW RUBBERS
 |
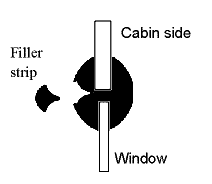
Claytonrite type window rubber. The cabin side and glass fit into slots in the rubber section, which are held in place by means of a filler strip. |
| Order codes WS61 to WS71, dependent on size. | |
WINDOW FITTING GUIDELINES
![]() Download Claytonrite window rubber fitting instructions
Download Claytonrite window rubber fitting instructions
The extruded rubber section has 3 recesses. One for the window, one for the panel and the third for a filler strip, which is used to lock the rubber seal against the window and the panel to ensure a good weatherproof fit. It is necessary to have the correct size of seal and this is can be determined from the window and panel thickness.
To remove the old window
Locate the ends of the filler strip and hook them out. Then remove the strip all of the way around. Push the window firmly on the middle and it should come out of the rubber quite easily. Be careful not to break the window, as you may need it for a template for a new one. Remove the rubber seal from the panel and clean the area where the seal has been.
Fitting the new seal
Fit the rubber seal around the aperture pushing it well into the corners to determine the length required. Cut the rubber approx. 25mm over length with good square joints to make a really tight butt joint. Remove the seal and apply a small bead of silicone sealant into the panel groove and then refit the rubber around the aperture, ensuring that the butt joint is at the top.
With the rubber in place apply a small bead of silicone into the window groove. Push the window into the rubber seal at the bottom. Using the glazing tool work the lip of the rubber over the edge of the window.
To fit the filler strip, feed it through the eye of the glazing tool and then work it into the channel in the rubber seal. Use plenty of lubricant to ease fitment. Start with the joint at the bottom (opposite that of the rubber section). Be careful not to stretch the filler strip as you go, otherwise it will shrink back at a later date. Cut the end with a few millimetres of overlap and push it into the groove so that it butts the other end with a tight joint.
ALUMINIUM FRAMES
|
|
The window is located in a rubber 'U' shaped channel inside of an Aluminium channel, which is fixed to the boat. It is advisable to bed the glass and rubber in with Silicone. |
![]() Download refurbishing Aluminium framed windows help sheet
Download refurbishing Aluminium framed windows help sheet
Over a period of time the rubber seals in window frames tend to deteriorate and start to let in water. The only option is to replace it with a new seal. Temporary repairs can be made using a silicone sealant, but these don't last very long.
The following procedures should be followed.
Glass/Perspex thickness
Internal width of channel
Internal depth of channel
If you are unable to locate the exact size in our catalogue, you can either modify one of our existing seals, or contact us with your requirements and we will try and source it for you.
Many seals used in old windows are no longer available and modern day equivalents have to be used.
Over a period of time the seals in sliding windows tend to wear and deteriorate. Old windows used to use either a felt or webbing material, but these have now been replaced with a velvet-covered rubber. There are two main types: a preformed U shape, or a flat strip that bends to fit inside a channel.
FLUSH FITTING WINDOWS
|
|
A rubber sealing strip is compressed between the cabin side and window. Suitable products are: - Solid neoprene - order codes 29 to 40, dependent on size. Expanded neoprene (plain or adhesive backed) - order codes 1 to 28, dependent on size. 1/2 round expanded neoprene - order codes 88 to 94, dependent on size. It is always advisable to smear clear Silicone onto the faces of the above material. This will take out any imperfections in the cabin side and also help to keep the gasket in place. It is also advisable to make pilot holes in the seal for the screws. This will help prevent the seal from being damaged when the screws are being tightened. |
Note: - We also recommend the use of a sealant (order codes 136 to 138) under the heads of fixing bolts to help prevent water penetration.
Listed are four alternative designs, which in the majority of cases provide watertight seals. Please bear in mind the following factors when choosing the design which best suits your application.
Listed are four alternative designs, which in the majority of cases provide watertight seals. Please bear in mind the following factors when choosing the design which best suits your application.
A. Trueness of hatch to hatch aperture and deck.
B. Sealing surface e.g. Knife edge or flat.
C. Size of seal which is usually stipulated by size of gap. (The seal can often be modified or tapered to allow for any inconsistency in the gap).
D. Seal should compress by approximately 20% to provide a watertight seal. (This also helps prevent the seal from being over compressed and damaged).
E. The weight of the hatch and the number of fixings holding down the hatch. (The heavier it is, or the greater the number of fixings there are, then the larger the seal can be).
TYPE 1
|
|
Expanded neoprene (closed cell i.e. does not absorb or transmit water.) Order code no. 1 to 28, dependent on size. Alternatively, half round sponge cord order code no. 88 to 94, dependent on size. |
TYPE 2
|
|
'P' section or 'tadpole' section. Order code no. P41 to P45, dependent on size. |
TYPE 3
|
|
'P' section, order code no. P42 or P43, dependent on size. 'B' section, order code no. RFB103. The 'P' section locates into the centre of the hollow 'B' section. |
TYPE 4
|
|
Edging seal, order code no. ETS58 or ETS59. The seal can also be fitted onto the hatch or locker lid. |
Please note that there are many different styles of hatches. The above drawings have been simplified to clarify the seal designs. Seals can either be fitted to the hatch, deck or both. Generally it is better to fit it to the hatch, as it will help prevent it from being damaged or dislodged.
|
MM
|
INCHES
|
|
1.5
|
1/16
|
|
3
|
1/8
|
|
5
|
3/16
|
|
6
|
1/4
|
|
8
|
5/16
|
|
10
|
3/8
|
|
12.5
|
1/2
|
|
16
|
5/8
|
|
19
|
3/4
|
|
22
|
7/8
|
|
25
|
1
|
| 1 Bar = 14.5 psi | |
| 1 Foot = 0.3048 Metres | |
| 1 Metre = 3.281 Feet | |
| 1 Yard = 0.9144 Metres | |
| 1 Sq. ft = .0929 Sq. Metre | |
| 1 Sq. Mtr = 10.76 Sq. Foot | |